Install Accumulo on a single VM (Ubuntu 16.04) with 3GB with Hadoop and Zookeeper
Install Accumulo on a single VM (Ubuntu 16.04) with 3GB with Hadoop and Zookeeper
Versions
For the versions I used the latest versions that were available at the time:
-
accumulo-1.8.0
-
hadoop-2.7.3
-
zookeeper-3.4.9
accumulo-1.8.0
hadoop-2.7.3
zookeeper-3.4.9
Setup the Environment
-
First start with an OS update
-
apt-get update
-
Install SSH if it is not already installed
-
apt-get install ssh rsync
-
Install the text editor you prefer. I personally love to work with vim
-
apt-get install vim
-
Java 8 or 7. I prefer 8. All the software we deploying are Java based.
-
apt-get install openjdk-8-jdk
-
Instead of sudoing for every command I perfer to login as root using
-
sudo su -
First start with an OS update
- apt-get update
Install SSH if it is not already installed
- apt-get install ssh rsync
Install the text editor you prefer. I personally love to work with vim
- apt-get install vim
Java 8 or 7. I prefer 8. All the software we deploying are Java based.
- apt-get install openjdk-8-jdk
Instead of sudoing for every command I perfer to login as root using
- sudo su -
Install Hadoop with HDFS only
We will be installing Hadoop with HDFS only as this is the only service that Accumulo needs.
Step 1 – Enable Passwordless SSH
We need passwordless ssh because Hadoop need to connect to the server over ssh without being prompted for password.
-
Generate an RSA key using
-
ssh-keygen -P ''
-
Add the generated key to the authorized_keys file.
-
cat ~/.ssh/id_rsa.pub >> ~/.ssh/authorized_keys
-
Test by
-
ssh localhost
Generate an RSA key using
- ssh-keygen -P ''
Add the generated key to the authorized_keys file.
cat ~/.ssh/id_rsa.pub >> ~/.ssh/authorized_keys
Test by
ssh localhost
Step 2 – Locate where Java was installed so we can set JAVA_HOME
-
which java
-
ls -l /usr/bin/java
-
ls -l /etc/alternatives/java

-
Take the output of the last command minus the jre/bin/java part and set JAVA_HOME with it
-
export JAVA_HOME=/usr/lib/jvm/java-8-openjdk-amd64/
-
Append this export to .bashrc
which java
ls -l /usr/bin/java
ls -l /etc/alternatives/java
Take the output of the last command minus the jre/bin/java part and set JAVA_HOME with it
- export JAVA_HOME=/usr/lib/jvm/java-8-openjdk-amd64/
Append this export to .bashrc
Step 3 – Install Apache Hadoop
-
Download Apache Hadoop. I chose the latest version at the time of writing this post
-
-
Extract it to /opt/
-
tar xvzf hadoop-2.7.3.tar.gz -C /opt/
Download Apache Hadoop. I chose the latest version at the time of writing this post
Extract it to /opt/
- tar xvzf hadoop-2.7.3.tar.gz -C /opt/
Step 4 – Configure Apache Hadoop
1 - Edit the core-site.xml and make the fs.defaultFS point to the correct nodename
-
vim /opt/hadoop-2.7.3/etc/hadoop/core-site.xml
-
and add
-
<property>
-
<name>fs.defaultFS</name>
-
<value>hdfs://localhost:9000</value>
-
</property>
-
Like this

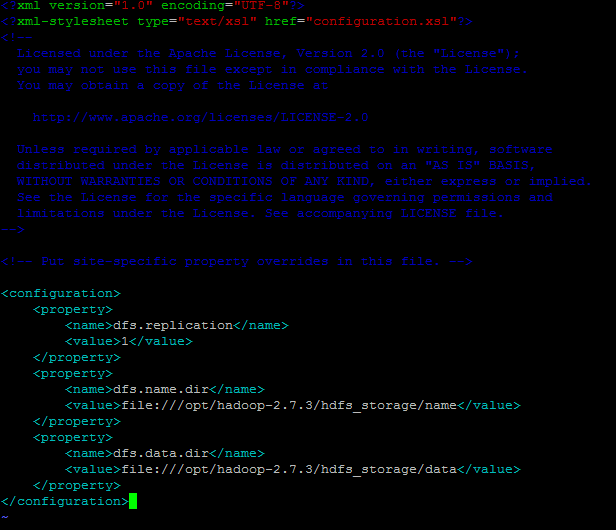
2 – Configure HDFS by editing hdfs-site.xml
-
vim /opt/hadoop-2.7.3/etc/hadoop/hdfs-site.xml
-
and add
-
<property>
-
<name>dfs.replication</name>
-
<value>1</value>
-
</property>
-
<property>
-
<name>dfs.name.dir</name>
-
<value>file:///opt/hadoop-2.7.3/hdfs_storage/name</value>
-
</property>
-
<property>
-
<name>dfs.data.dir</name>
-
<value>file:///opt/hadoop-2.7.3/hdfs_storage/data</value>
-
</property>
-
Like this
-
dfs.replication: This number specifies how many times a block is replicated by Hadoop. By default, Hadoop creates 3 replicas for each block. In this tutorial, use the value 1, as we are not creating a cluster.
-
hdfs_storage directory will be created under /opt/hadoop-2.7.3/
-
dfs.name.dir: This points to a location in the filesystem where the namenode can store the name table. You need to change this because Hadoop uses /tmp by default. Let us use hdfs_storage/name to store the name table.
-
dfs.data.dir: This points to a location in the filesystem where the datanode should store its blocks. You need to change this because Hadoop uses /tmp by default. Let us use hdfs_storage/data to store the data blocks.
3 – Configure MapReduce by editing mapred-site.xml
-
cp /opt/hadoop-2.7.3/etc/hadoop/mapred-site.xml.template /opt/hadoop-2.7.3/etc/hadoop/mapred-site.xml
-
vim /opt/hadoop-2.7.3/etc/hadoop/mapred-site.xml
-
and add
-
<property>
-
<name>mapred.job.tracker</name>
-
<value>localhost:9001</value>
-
</property>
-
Like this
 4 – Initialize the Hadoop storage directory
-
cd /opt/hadoop-2.7.3/bin
-
./hdfs namenode -format
vim /opt/hadoop-2.7.3/etc/hadoop/core-site.xml
and add
<property>
<name>fs.defaultFS</name>
<value>hdfs://localhost:9000</value>
</property>
Like this
vim /opt/hadoop-2.7.3/etc/hadoop/hdfs-site.xml
and add
<property>
<name>dfs.replication</name>
<value>1</value>
</property>
<property>
<name>dfs.name.dir</name>
<value>file:///opt/hadoop-2.7.3/hdfs_storage/name</value>
</property>
<property>
<name>dfs.data.dir</name>
<value>file:///opt/hadoop-2.7.3/hdfs_storage/data</value>
</property>
Like this
dfs.replication: This number specifies how many times a block is replicated by Hadoop. By default, Hadoop creates 3 replicas for each block. In this tutorial, use the value 1, as we are not creating a cluster.
hdfs_storage directory will be created under /opt/hadoop-2.7.3/
dfs.name.dir: This points to a location in the filesystem where the namenode can store the name table. You need to change this because Hadoop uses /tmp by default. Let us use hdfs_storage/name to store the name table.
dfs.data.dir: This points to a location in the filesystem where the datanode should store its blocks. You need to change this because Hadoop uses /tmp by default. Let us use hdfs_storage/data to store the data blocks.
cp /opt/hadoop-2.7.3/etc/hadoop/mapred-site.xml.template /opt/hadoop-2.7.3/etc/hadoop/mapred-site.xml
vim /opt/hadoop-2.7.3/etc/hadoop/mapred-site.xml
and add
<property>
<name>mapred.job.tracker</name>
<value>localhost:9001</value>
</property>
Like this
cd /opt/hadoop-2.7.3/bin
./hdfs namenode -format
Step 5 – Run Apache Hadoop
-
cd /opt/hadoop-2.7.3/sbin
-
./start-dfs.sh
-
Again we only need HDFS to be running for Accumulo to work
-
Test to check if everything is working properly by using
-
jps
-
You should get

-
And try
-
netstat –tupln
-
You should get

-
Go to http://server_ip:50070 and browse through the NameNode interface to make sure everything is working

cd /opt/hadoop-2.7.3/sbin
./start-dfs.sh
Again we only need HDFS to be running for Accumulo to work
Test to check if everything is working properly by using
jps
You should get
And try
netstat –tupln
You should get
Go to http://server_ip:50070 and browse through the NameNode interface to make sure everything is working
Install Zookeeper
Step 1 – Install Zookeeper
-
Download Zookeeper. I chose the latest version at the time of writing this post
-
-
Extract it to /opt/
-
tar xvzf zookeeper-3.4.9.tar.gz -C /opt/
Download Zookeeper. I chose the latest version at the time of writing this post
Extract it to /opt/
- tar xvzf zookeeper-3.4.9.tar.gz -C /opt/
Step 2 – Configure Zookeeper
-
Copy the example configuration to zoo.cfg
-
cp /opt/zookeeper-3.4.9/conf/zoo_sample.cfg /opt/zookeeper-3.4.9/conf/zoo.cfg
- Edit zoo.cfg and set a dataDir because if you leave the default which points to /tmp then the zookeeper data will be deleted after every restart
- dataDir=/opt/zookeeper-3.4.9/datadir
-
Start Zookeeper
-
/opt/zookeeper-3.4.9/bin/zkServer.sh start
Copy the example configuration to zoo.cfg
cp /opt/zookeeper-3.4.9/conf/zoo_sample.cfg /opt/zookeeper-3.4.9/conf/zoo.cfg
Start Zookeeper
/opt/zookeeper-3.4.9/bin/zkServer.sh start
Install Accumulo
Step 1 – Install Accumulo
-
Download Accumulo. I chose the latest version at the time of writing
-
-
Extract it to /opt/
-
tar xvzf accumulo-1.8.0-bin.tar.gz -C /opt/
Download Accumulo. I chose the latest version at the time of writing
Extract it to /opt/
- tar xvzf accumulo-1.8.0-bin.tar.gz -C /opt/
Step 2 – Configure Accumulo
-
Accumulo comes with a configuration script that simplifies a lot of the configuration tasks and you can call it via
-
cd /opt/accumulo-1.8.0/bin
-
./bootstrap_config.sh
-
I chose the following

Accumulo comes with a configuration script that simplifies a lot of the configuration tasks and you can call it via
- cd /opt/accumulo-1.8.0/bin
- ./bootstrap_config.sh
- I chose the following
Step 3 – Set HADOOP_HOME and ZOOKEEPER_HOME
-
Set both HADOOP_HOME AND ZOOKER_HOME as follows and append them to .bashrc
-
export ZOOKEEPER_HOME=/opt/zookeeper-3.4.9
-
export HADOOP_HOME=/opt/hadoop-2.7.3
Set both HADOOP_HOME AND ZOOKER_HOME as follows and append them to .bashrc
- export ZOOKEEPER_HOME=/opt/zookeeper-3.4.9
- export HADOOP_HOME=/opt/hadoop-2.7.3
Step 4 – Set Accumulo Monitor to bind all network interfaces
-
By default, Accumulo's HTTP monitor binds only to the local network interface. To be able to access it over the Internet, you have to set the value of ACCUMULO_MONITOR_BIND_ALL to true.
-
vim /opt/accumulo-1.8.0/conf/accumulo-env.sh
-
Locate ACCUMULO_MONITOR_BIND_ALL and uncomment it
By default, Accumulo's HTTP monitor binds only to the local network interface. To be able to access it over the Internet, you have to set the value of ACCUMULO_MONITOR_BIND_ALL to true.
- vim /opt/accumulo-1.8.0/conf/accumulo-env.sh
- Locate ACCUMULO_MONITOR_BIND_ALL and uncomment it
Step 5 – Set location of Accumulo on HDFS
-
We need to set where Accumulo will host its files and we do that by editing accumulo-site.xml
-
vim /opt/accumulo-1.8.0/conf/accumulo-site.xml
-
and add under the value for instance.volumes
-
hdfs://localhost:9000/accumulo

We need to set where Accumulo will host its files and we do that by editing accumulo-site.xml
vim /opt/accumulo-1.8.0/conf/accumulo-site.xml
and add under the value for instance.volumes
hdfs://localhost:9000/accumulo
Step 6 – Initialize Accumulo HDFS Folder
-
This step basically formats the hdfs folder to host Accumulo
-
/opt/accumulo-1.8.0/bin/accumulo init
This step basically formats the hdfs folder to host Accumulo
- /opt/accumulo-1.8.0/bin/accumulo init
Step 7 – Adjust memory configuration
-
On the server that I was using Accumulo complained that memory is not enough for the Tablet Server so I adjusted that by editing accumulo-site.xml and setting
-
<name>tserver.memory.maps.max</name>
-
<value>40M</value>
-
And
-
<name>tserver.cache.data.size</name>
-
<value>4M</value>
-
And
-
<name>tserver.cache.index.size</name>
-
<value>10M</value>
Step 8 – Adjust Max Open files
On the server that I was using Accumulo complained that memory is not enough for the Tablet Server so I adjusted that by editing accumulo-site.xml and setting
- <name>tserver.memory.maps.max</name>
- <value>40M</value>
- And
- <name>tserver.cache.data.size</name>
- <value>4M</value>
- And
- <name>tserver.cache.index.size</name>
- <value>10M</value>
-
Accumulo complained that that Max open files was set to 1024 and that the recommended was 32768. The solution is to run this command
-
ulimit -n 32768
-
And add it to .bashrc
Accumulo complained that that Max open files was set to 1024 and that the recommended was 32768. The solution is to run this command
- ulimit -n 32768
And add it to .bashrc
Step 9 – Adjust Max Open files
-
Accumulo complained that that Max open files was set to 1024 and that the recommended was 32768. The solution is to run this command
-
ulimit -n 32768
-
And add it to .bashrc
Accumulo complained that that Max open files was set to 1024 and that the recommended was 32768. The solution is to run this command
- ulimit -n 32768
And add it to .bashrc
Step 10 – Allow Accumulo to be accessed from the outside
-
By default Accumulo is setup to run on localhost so in order to make it run on the network interface exposed to the outside world you need to
-
Edit /etc/hosts file and add set the name of the machine to the correct IP. In my case it was
-
192.168.75.141 computer_name
-
Edit /opt/accumulo-1.8.0/conf/slaves and replace localhost with the name of machine
- vim /opt/accumulo-1.8.0/conf/slaves
By default Accumulo is setup to run on localhost so in order to make it run on the network interface exposed to the outside world you need to
- Edit /etc/hosts file and add set the name of the machine to the correct IP. In my case it was
- 192.168.75.141 computer_name
- Edit /opt/accumulo-1.8.0/conf/slaves and replace localhost with the name of machine
- vim /opt/accumulo-1.8.0/conf/slaves
Step 11 – Run Accumulo
- Once everything is setup you can run Accumulo by issuing this command
- /opt/accumulo-1.8.0/bin/start-all.sh
- To test that everything is running correctly
- Start Accumulo shell and run the command tables
- /opt/accumulo-1.8.0/bin/accumulo shell
- Access the Accumulo monitor via http://server_ip:9995 you should get something like this

Comments
Post a Comment